RAP2的安装和部署
目录
1 Node.js 安装:
2 Mysql 5.7+ 安装
3 Redis 安装见文章
4 后端 rap2-delos 安装
5 前端 rap2-dolores 安装
RAP2是在RAP1基础上重做的新项目,它包含两个组件(对应两个Github Repository)。
rap2-delos: 后端数据API服务器,基于Koa + MySQLlink
rap2-dolores: 前端静态资源,基于React link
什么是RAP?
rap是一款API 文档管理工具,在 RAP 中,可以定义接口的 URL、请求 & 响应细节格式等等。同时 RAP 还提供 MOCK 服务、测试服务等自动化工等工具,帮助开发团队高效开发。
git 地址:
https://github.com/thx/rap2-dolores
https://github.com/thx/rap2-delos
特点
强大的 GUI 界面工具 ,完全可视化可编辑的管理工具。
完善的 MOCK 服务,文档定义好后接口就已准备就绪,可方便的 mock 调用接口
庞大的用户群 ,RAP 在阿里巴巴广泛使用,也有许多著名的公司在用。

以下的安装步骤都是基于Centos 7 进行安装
1、Node.js 安装:
#centos:
curl -sL https://rpm.nodesource.com/setup_8.x | bash -
yum  install  -y nodejs
# Using Ubuntu
curl -sL https://deb.nodesource.com/setup_8.x | sudo -E bash -
sudo apt-get install -y nodejs
# Using Debian, as root
curl -sL https://deb.nodesource.com/setup_8.x | bash -
apt-get install -y nodejs
yum 安装会比较慢,因为服务器是在国外。
如果上面的安装不成功的,我们可以使用二进制包安装。
wget  https://nodejs.org/dist/latest-v8.x/node-v8.14.0-linux-x86.tar.gz
tar -zxvf node-v8.14.0-linux-x64.tar.gz
mv   node-v8.14.0-linux-x64  /opt/node
ln -s /opt/node/bin/node  /usr/bin/node
ln -s /opt/node/bin/npm  /usr/bin/npm
配置淘宝镜像源
安装淘宝镜像源
npm install -g cnpm --registry=http://registry.npm.taobao.org
安装 pm2
npm install -g pm2
2、Mysql 5.7+ 安装
rpm包安装:
在centos7上要先移除mariadb
yum -y remove mariadb*
下载mysql
wget https://dev.mysql.com/get/Downloads/MySQL-5.7/mysql-5.7.26-1.el7.x86_64.rpm-bundle.tar
解压mysql下载的包
tar -xvf mysql-5.7.26-1.el7.x86_64.rpm-bundle.tar
安装依赖:
yum install libaio.so.1*
yum install perl
安装mysql
rpm -ivh mysql-community-common-5.7.26-1.el7.x86_64.rpm
rpm -ivh mysql-community-libs-5.7.26-1.el7.x86_64.rpm
rpm -ivh mysql-community-client-5.7.26-1.el7.x86_64.rpm
rpm -ivh mysql-community-server-5.7.26-1.el7.x86_64.rpm
启动:
systemctl  start  mysqld
获取密码:
cat  /var/log/mysqld.log  |grep  'generated'
登录之后会要求我们更改密码:
alter user 'root'@'localhost' identified by '123456';
3、Redis 安装与错误解决办法
redis 建议不配置密码,并绑定127.0.0.1 ,只能本地访问
安装好之后,并以后台任务运行。
redis 安装
wget http://download.redis.io/releases/redis-4.0.11.tar.gz
tar xzf redis-4.0.11.tar.gz
cd redis-4.0.11
make
启动服务端
src/redis-server
客户端连接与测试
src/redis-cli
redis> set foo bar
OK
redis> get foo
"bar"
redis常用命令
redis-cli
-h  指定远程登陆ip
-p  指定远程redis访问端口
-n  指定库b编号
-a  指定密码
示例
./redis-cli  -h 127.0.0.1  -p 6379 -n 3  -a djx
远程执行命令
清空所有的数据
./redis-cli  -h 127.0.0.1  -p 6379 -n 3  -a djx  flushall
redis设置密码
临时生效,在命令行用 config set requirepass password 来进行设置。重启redis后即失效。
[root@djx2 src]# ./redis-cli
127.0.0.1:6379> config set  requirepass djx
OK
127.0.0.1:6379> config get  requirepass
(error) NOAUTH Authentication required.
127.0.0.1:6379> auth djx
OK
127.0.0.1:6379> config get  requirepass
1) "requirepass"
2) "djx"
永久生效
通过在redis的配置文件redis.conf 进行配置,在配置文件中有个参数: requirepass 这个就是配置redis访问密码的参数;
requirepass password
然后我们启动的时候需要指定我们的配置文件进行启动。
redis-server /etc/redis.conf
redis 指定端口,默认是6379,我们可以更改成公司内部统一的端口。
port 6379
redis 指定监听,redis 默认绑定的是 127.0.0.1 ,也就是只能本地访问了,如果我们需要让外网也可以进行访问,那么我们需要更改默认的绑定。
bind 0.0.0.0
redis 指定日志文件存放位置,默认日志文件的存放位置是为空的,也就是直接在控制台输出了,我们可以在logfile中配置日志文件路径。
logfile "/var/log/redis.log"
redis 指定数据存放位置(要指定),在redis.conf 设置
# The filename where to dump the DB
dbfilename dump.rdb  #指定数据存放的文件名称
# The working directory.
#
# The DB will be written inside this directory, with the filename specified
# above using the 'dbfilename' configuration directive.
#
# The Append Only File will also be created inside this directory.
#
# Note that you must specify a directory here, not a file name.
dir ./   #指定数据存放的位置。
创建目录
mkdir  /opt/redis/data/
在配置文件中指定目录
dir   /opt/redis/data/
redis 开启rdbchecksum
该参数,在3.2版本和4.0版本是默认开启的,但是在2.4版本中是没有开启的,该参数我们进行使用dump.rdb文件时是有作用的,因为在使用dump.rdb 的时候有该值是会效验该文件的完整性。rdbchecksum设置为no的话就不会效验该文件的完整性。
我们可以使用nohup和& 让redis在后台正常运行,并写入日志到/var/log/redis.log
nohup ./src/redis-server ./redis.conf >>/var/log/redis.log 2>&1 &
安装中遇到的错误

- 错误1 gcc 编译器没有安装,解决办法 : 安装gcc 编译器yum install gcc -y
错误2 jemalloc/jemalloc.h: No such file or directory。 (注意,这里需要特别注意)
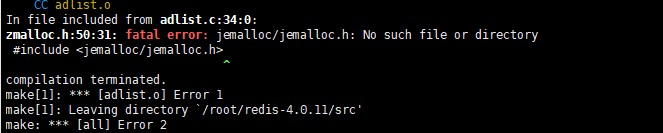
针对这个错误,我们可以在README.md 文件中看到解释。
---------
Selecting a non-default memory allocator when building Redis is done by setting
the `MALLOC` environment variable. Redis is compiled and linked against libc
malloc by default, with the exception of jemalloc being the default on Linux
systems. This default was picked because jemalloc has proven to have fewer
fragmentation problems than libc malloc.
To force compiling against libc malloc, use:
    % make MALLOC=libc
To compile against jemalloc on Mac OS X systems, use:
    % make MALLOC=jemalloc
Verbose build
-------------
4、后端 rap2-delos 安装
安装git
yum install -y git
创建数据库 RAP2_DELOS_APP
CREATE DATABASE IF NOT EXISTS RAP2_DELOS_APP DEFAULT CHARSET utf8 COLLATE utf8_general_ci;
rap2-delos 安装
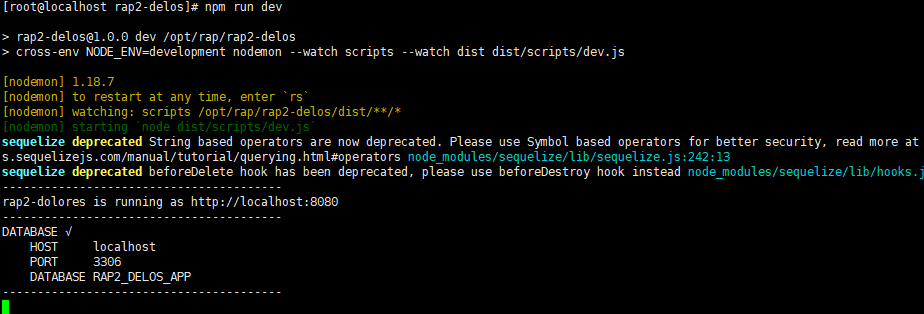
# 下载源代码
git clone https://github.com/thx/rap2-delos.git
# 切换目录
cd  rap2-delos
# 安装依赖包
npm install
# 安装 TypeScript 编译包
npm install typescript -g
# 编辑测试配置文件(注意这里只是为了测试)
注意这个文件路径   rap2-delos/src/config/config.dev.js
修改的内容(大约在11行左右开始):
将数据库配置成我们的数据库名称和路径和用户和密码
dialect: 'mysql',
host: 'localhost',
port: 3306,
username: 'root',
password: '123456',
database: 'RAP2_DELOS_APP',
# 构建
注意:在 rap2-delos  主目录下操作
npm run build
# 初始化数据库(一定要在根目录执行哦(rap2-delos/))
npm run create-db
创建成功了会有提示 “Run create-db finished successfully.”
# 执行mocha测试用例和js代码规范检查
npm run check
# 启动开发模式的服务器 监视并在发生代码变更时自动重启
npm run dev
正常启动:
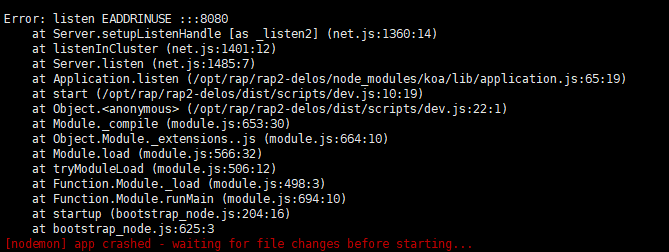
如果出现下面的错误就是端口被占用了
编辑正式配置文件(配置正式数据库)
rap2-delos/dist/config/config.prod.js  (注意这次修改的配置文件的目录和上面那次目录不一样的。)
修改的内容(大约在12行左右开始):
将数据库配置成我们的数据库名称和路径和用户和密码
dialect: 'mysql',
host: process.env.MYSQL_URL || 'localhost',
port: (process.env.MYSQL_PORT && parseInt(process.env.MYSQL_PORT)) || 3306,
username: process.env.MYSQL_USERNAME || 'root',
password: process.env.MYSQL_PASSWD || '123456',
database: process.env.MYSQL_SCHEMA || 'RAP2_DELOS_APP',
#  启动正式(生产)模式
npm start
#  查看服务状态和日志
pm2  list
pm2  logs  rap-server-delos
测试是否正常:
ip:8080
显示:
RAP2后端服务已启动,请从前端服务(rap2-dolores)访问。 RAP2 back-end server is started, please visit via front-end service (rap2-dolores)
表示正常
5、前端 rap2-dolores 安装
# 拉取代码
git clone https://github.com/thx/rap2-dolores.git
# 切换目录
cd  rap2-dolores
# 初始化
npm install
下面这步可以不做,直接配置正式。
# 开发模式配置**(开发配置可以不做)
    配置文件路径:/src/config/config.dev.js
    module.exports = {
      serve: 'http://127.0.0.1:8080',
      keys: ['some secret hurr'],
      session: {
        key: 'koa:sess'
      }
    }
    更改serve  字段
    改成我们的后端访问地址。 注意加 http://
    # test cases 测试用例
    npm run test
    # will watch & serve automatically 会自动监视改变后重新编译
    npm run dev
正式配置,必须配置
配置文件路径:/src/config/config.prod.js
module.exports = {
  serve: 'http://127.0.0.1:8080',
  keys: ['some secret hurr'],
  session: {
    key: 'koa:sess'
  }
}
更改serve  字段
改成我们的后端访问地址,访问地址直接使用ip,不要使用127.0.0.1。 注意加 http://,
#  编译React生产包
npm run build
#  安装serve
npm install -g serve
# 运行
serve -s ./build -p 80
-p 为指定端口
# 后台运行
nohup  serve -s ./build -p 80  &